Enabling the Waitlist
As a part of the online registration setup, you can activate the Waitlist feature. This feature can be enabled for Single registration as well as for Multiple registrations.
Follow the instructions below to enable the waitlist for single registration:
While setting up a new program, in the Basic Information step:
- Scroll the page down to find the Enable waitlist checkbox
- Tick the checkbox
- Automatically add participants to the waitlist when the program reaches capacity:
This is the default behavior. Once the program reaches its maximum capacity, any additional registrants will automatically be placed on the waitlist. This ensures that no more participants can register until a spot opens up. - Use the waitlist to bypass regular registration:
Alternatively, you can choose to send all incoming registrations directly to the waitlist, regardless of whether the program has reached capacity. To activate this, check the "Use the waitlist feature to bypass regular registration" checkbox under Program Restrictions. This option allows you to review and approve each application before finalizing the enrollment.
- Customize the waitlist settings as follows:
Waitlist Button Label: Specify the label text that will appear on the waitlist button.
Additional Information: Add any specific information that you want to display to users when they join the waitlist. Add your waitlist policy in the Waitlist policy box.

The waitlist option automatically starts when the program reaches its capacity after it has been activated. For the waitlist to work, you must restrict the number of participants for that particular program by setting the program's maximum capacity. To do so:
- Click Save and continue
After saving your changes, you will be redirected to the Schedules & Fees step
- Scroll the page down to find the Program enrollment capacity section
- Set a maximum limit for the program
 Note: For Before/After Care programs you can set the program`s capacity in the Fees step.
What do participants see?
The following screenshot displays the Registration page when the program is full. As you can see, the regular registration button is replaced by ADD TO WAITLIST button.
Registrants will follow the regular registration flow to add the order to their cart, but they cannot pay for the program and complete their order. Instead, they will see a label that lets them know their order is now on the waitlist.
Follow the instructions below to enable the waitlist for Multiple registrations:
If you use the season grid mode, which allows users to register for multiple classes at once, the waitlist must be activated for Multiple registrations.
- Go to the Admin dashboard > Seasons > Your desired season
- Choose Setup > Multi-class registration > Additional options

- Scroll the loaded page down to find the Enable waitlist checkbox
- Tick the checkbox
After checking the box, you can add your policy to the Waitlist policy box.

Note: Once you enable the waitlist for Multiple registrations in a season, it automatically becomes activated for all the programs within that season.What do participants see?
Below is an example of the multi-class registration page when the program has reached total capacity. Program status displays that the program is full and only can be added to the waitlist.
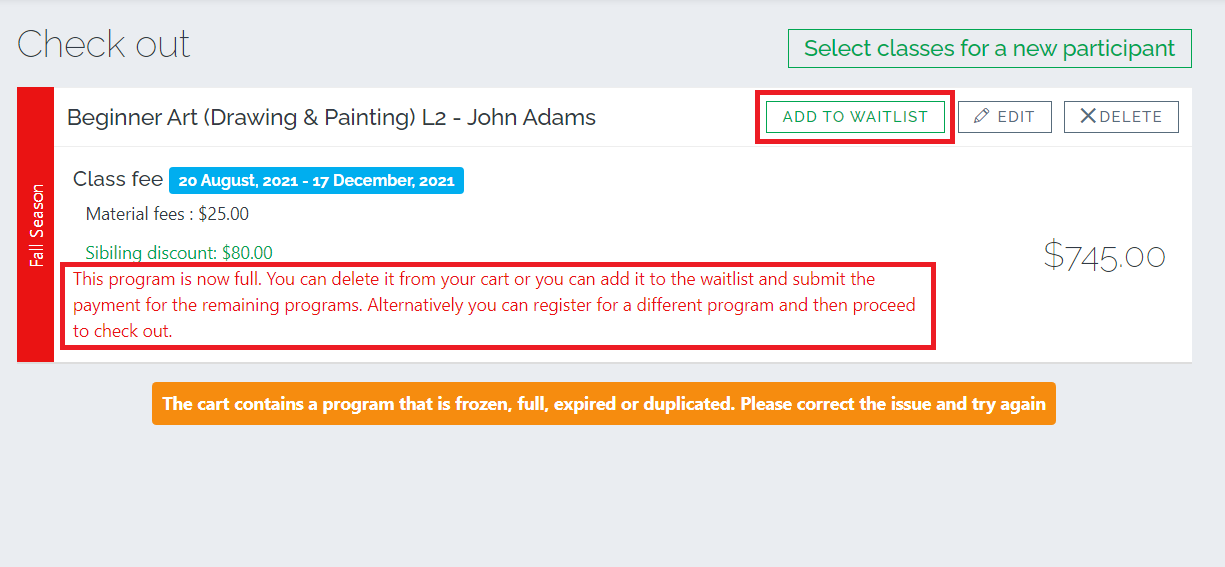
It is possible that the registrants might have an order in their cart and by the time they click on the "Place Order" button, the program capacity is full. If the waitlist is enabled for that particular program/schedule, a message will be displayed in red color that says the program is full and can be added to the waitlist, to do so the registrant should click the ADD TO WAITLIST button. see the screenshots below.
Related articles:
How to enable the waitlist notification email and customize its template?
Contact us
Please don't hesitate to reach out if you have any questions. Contact our support team at support@jumbula.com.
Related Articles
How to manage waitlist?
Overview The waitlist feature in Jumbula lets you collect registrations even when a program is full. Instead of rejecting new sign-ups, additional registrants are placed on a waitlist and can be manually moved into the program when a spot becomes ...How to enable and customize the waitlist notification email?
Overview When a participant is added to or removed from a waitlist, two notification emails are sent. One email notifies the parent to confirm the change, and the other is sent to the admin. Before You Begin ✅ Setup is done in the Classic admin ...Are waitlist notifications sent automatically?
You need to notify participants to complete registration for available spots - the system doesn't automatically assign. You can complete registration manually or enable the waitlisted order for self-completion. ? Watch tutorial → Waitlist management ...Can I manually move a student from a waitlist to an open spot?
Yes, as admin you can move waitlisted students into open spots or move students from programs onto the waitlist. ? Watch tutorial → Waitlist management Need help? Our support team is here to help you succeed. Contact us at support@jumbula.com, or ...How to Enable The Lottery System
Overview The lottery system lets you randomly select which users can register for a program from a pool of candidates. It’s especially useful for high-demand programs with limited spots, ensuring a fair and unbiased selection process. The lottery ...